
Robar Flooring offers professional hardwood floor installation services in Toronto, Mississauga, and the entire GTA.
Why Install Hardwood Flooring?
Investing in hardwood floor installation is a decision that any homeowner is proud to make. Hardwood offers the perfect blend of durability, elegance, and timeless beauty. It not only improves interior beauty but it also contributes to the value of the property. Additionally, they offer sophistication and warmth that other flooring materials simply can’t match.
Hardwood floors are known for their longevity — they can last for many decades. Proper care and maintenance can make them last even upwards of a century and still retain their beauty and functionality. After laying hardwood floor, the maintenance is relatively easy – a quick sweep or a light vacuum accompanied by occasional damp mopping should do the job.
Prior to commencing the hardwood floor installation process, there are a number of factors that should be taken into consideration. It begins with choosing the right type of wood; there are different species of woods which come in different hardness, shades and textures to meet various requirements and preferences.
After resolving on the type of wood to use, it is important to think about the shade. If you would like full colors, stains will be the best; otherwise, natural timber will suit best with its top coat finish that accentuates the grain of the wood. Each finish option will offer a different degree of protection and gloss that will affect the appearance and the lifespan of your floors.
Another important factor is the method of installing hardwood floors. It is recommended to hire an expert, to avoid expensive mistakes. Here’s everything you need to know about installing hardwood floors in your home.
Preparing for Hardwood Floor Installation
Before laying hardwood floors, wood acclimatization to your home’s conditions is of vital importance. This step helps the hardwood to acclimate to temperature and humidity levels in your home which helps to avoid problems such as gaps or warping in future. A few days before the prearranged hardwood floor installation, order the hardwood flooring and spread the planks in the room where they are to be installed.
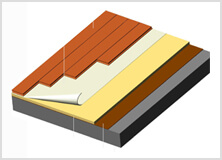
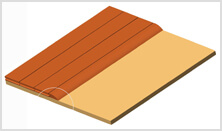
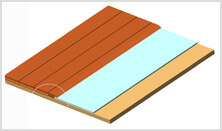
Hardwood floor is laid over a level, clean board or plywood sub-floor. The sub-floor needs to be well inspected. Any dips should be repaired by shimming between the floor joists and the sub-floor. Loose boards should be nailed or replaced, raised edges should be levelled and any openings filled. Over a sub-floor a layer of building paper is laid to make the floor draft-tight. This layer can also help exclude moisture from below and smooth out slight irregularities in the sub-flooring. A plank hardwood should not be laid directly on top of a concrete slab. For this kind of hardwood floor installation a layer of plywood needs to be installed first.
Wood Floor Installation Process
 Hardwood strips are laid perpendicular to the floor joists or wood sleepers. If an existing board sub-floor has been laid perpendicular to the joist the planks need to be laid across the grain of the strips.
Since hardwood expands and contracts with changes in humidity, a 1/2″ gap is left between the hardwood flooring and the wall around the perimeter of the room. This gap is more critical parallel to the floor boards since wood will expand and contract more across its grain or across the width of the strips.
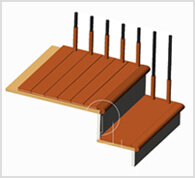
The first hardwood strip is placed 1/2″ from the wall with the grove edge facing the wall. It is face nailed close enough to the grooved edge so that the nails can be concealed by the base and the quarter-round. All other nails go through the tongue at 45 degree angle every 10 to 12 inches. As the floor is laid, the lengths of planks are selected so that end joints are well staggered and at least 6″ apart from each other. The last strip is face nailed just like the first strip. The expansion gap is covered by baseboard and quarter-round (see diagrams).
Most hardwood floor installations require transition and finishing trims:
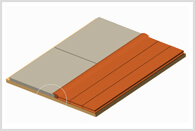
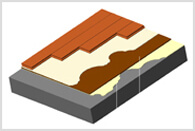
Reducer
Hardwood Floor Reducer
Hardwood floor reducer used as a transition from a wood floor to a thinner floor, such as vinyl. Also works to trim out the edge of fireplace or to camouflage a sliding door track. The edge that leads to the lower floor may be either square or rounded. The edge that faces into the room may either overlay the floor or flush with it. (see diagrams).
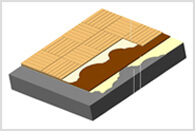
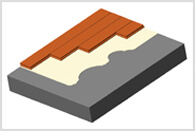
 T-Cap Reducer
This type of reducer is a transition between floors of different heights. One side cover the wood floor, the other covers ceramic tile, laminate wood or other flooring. See diagram.
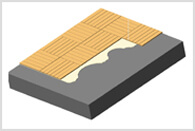
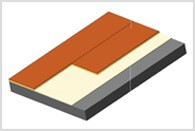
 Stair Nosing
Stairs, though not necessary with prefabricated treads. It is also good for trimming the edges of a floor that sits slightly above another floor.
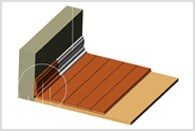
Threshold
Is used where floors end in doorways.
Other Samples of Hardwood Floor Installation:
| Parquet Floor | Parquet Floor | Engineered Floor | ||
|---|---|---|---|---|
 |
 |
 |
||
| Engineered Floor | Floating or Laminated Floor | Baseboard and 1/4-round | ||
 |
 |
 |